CSA Share for June 25th, Plus Farmer’s Market Challenge–Weeks #3 and #4, and a Recipe for Au Gratin Potatoes

Hello again, friends!

This week’s CSA share consisted of shiitake mushrooms (a pint), a pint of broccoli, a bag of salad greens, a quart of peas, a pound of farm fresh bacon, and a bag of peanut butter granola. Many of the items are similar to last week because I didn’t use those quickly enough and many spoiled. 😦 (However, I’ve made up for this and have consumed most of the items we brought home this week; hence, I am lacking photographs.) 🙂

In addition, for Week #3 of our Farmer’s Market Challenge, I spent $2.50 on a quart of peas (out of a $15 budget), and I didn’t use those soon enough either, so they went to waste. I am wondering if there is something in our refrigerator’s produce drawers that is hastening the decline of our other veggies (supposedly, some vegetables don’t play well with others in storage), as things spoiled sooner than usual.

For Week #4, since much went to waste last week, I spent $3.00 (of $15) on new potatoes, and those I have used. We made au gratin potatoes with them, as well as adding ham to the recipe (ham from a previous week’s CSA share…was stored in our freezer).

Here is a link to the recipe…we added diced ham to ours: http://allrecipes.com/recipe/creamy-au-gratin-potatoes/

The taters….

DSC_2356

Slicing them for use….

DSC_2357


The ingredients…

DSC_2359

Mixed in the bowl….

DSC_2364


DSC_2369


Finished product…verdict? Yummy.

DSC_2371


CSA 2014: Blackberry Glazed Pork Chops

I received fresh pork chops from our first bundle of CSA goodies, and I was debating what I wanted to do with them. Then I realized that I had this….

DSC_2320


and this….

DSC_2323


…in my pantry. Then, I knew I had to make one of my favorite recipes, Blackberry Glazed Pork Chops.

I came across the recipe years ago, and I’ve tweaked it here and there to where I now make it from memory, really. However, I’m putting it to paper to share with you. 😉

The ingredients:

-4 pork chops, roughly 4-6 ounces per chop

-2 tablespoons olive oil

-Montreal Steak seasoning (to taste)

-1 cup blackberry preserves (seeded or seedless, your choice)

-2 tablespoons fresh lemon juice

-2 tablespoons soy sauce

-1 teaspoon ground cinnamon

In a skillet, heat the olive oil until the pan is hot. Sprinkle the steak seasoning over each side of the chops, and place the chops into the oil. Fry the chops on medium heat for 5-7 minutes per side, until the chops reach an internal temperature of 145 degrees or more. Set aside.

Meanwhile, combine the preserves, the lemon juice, the soy sauce, and the cinnamon into a small saucepan. Heat over low to medium heat until the preserves melt a bit. Drizzle the berry sauce over the completely cooked chops and serve.

DSC_2326

No-Bake Power Poppers

(I adapted the recipe from http://www.gimmesomeoven.com/no-bake-energy-bites/. She adapted it from someone else. Etc, etc. This recipe is so variable and is found in so many places online.)

My husband LOVES no-bake cookies. It was a childhood favorite in his family. Meanwhile, honestly, I can take or leave them. I’m more of a granola bar sort of gal. So, when I found this recipe for bite-sized, no-bake bundles of energizing goodness, I was sold. I did, however, want to make them my own, which I will share with you.

The critic….

© This Path Less Traveled

© This Path Less Traveled

The players….

© This Path Less Traveled

© This Path Less Traveled


  • 1 cup uncooked oats
© This Path Less Traveled

© This Path Less Traveled

  • 2/3 cup toasted coconut flakes
  • 1/2 cup peanut butter
© This Path Less Traveled

© This Path Less Traveled

  • 1/2 cup almond flour
  • 1/4 to 1/2 cup chia seeds (or ground flax seed)
© This Path Less Traveled

© This Path Less Traveled

  • 1/2 cup chocolate chips
© This Path Less Traveled

© This Path Less Traveled

  • 1/3 cup honey
© This Path Less Traveled

© This Path Less Traveled

  • 1 tsp. vanilla extract

Then, mix the ingredients together in a large bowl, either by hand or stand mixer

© This Path Less Traveled

© This Path Less Traveled


DSC_2060

© This Path Less Traveled

Roll dough into balls, place on a cookie sheet lined with parchment paper, and then chill for 30 minutes in the refrigerator. Enjoy!

© This Path Less Traveled

© This Path Less Traveled


© This Path Less Traveled

© This Path Less Traveled


Yield: about 2 dozen. Prep and cook time: 10 minutes total.

CLOSED: Experimenting With Homemade Laundry Soap, Part Two–Plus, a Giveaway and Review of “The Busy Mom’s Guide: Taming the Laundry Monster”

So, a couple weeks ago, I decided to try to make my own homemade laundry detergent.

For years, I had remained skeptical of homemade laundry soap for a number of reasons. For starters, I was only aware of a liquid recipe, which seemed sloppy and time-consuming, and the reviews for the recipe were mixed–some had great success, while others claimed that it left clothing feeling and looking dingy.  Second, to be honest with you, I love buying laundry products–I have shelves full of stain removers, wool washes, detergents (powdered and liquid, eco-friendly and commercial grade), fragrance crystals, you name it. I despise doing the wash, but there’s something about adding scents and boosters that appeals to me. Maybe it’s because the clothes come out of the wash smelling heavenly and looking bright and bold, I don’t know. Third, I have tried everything on my daughter’s cloth diapers, and the only thing that truly gets them clean is mainstream detergent, plus laundry boosters, so I kept asking myself, “Why make detergent if I have to buy some from the store anyhow?”

However, there are several inherent problems with the way I have been doing things. There are multiple powdered detergent recipes available online, so the outdated liquid recipe is not the only option. Buying product after product also adds up financially–not to mention, it’s likely not the best thing for our skin, or for our washer to be adding so many products into a cycle.  And even if I have to buy commercial detergent and laundry boosters for the cloth diapers, only having to buy detergent for those will still save me money because I’m buying a smaller amount just for the diapers than I would if I was purchasing store-bought detergent for the entire family. (Plus, my toddler is in the middle of potty-training, so the need for the store-bought stuff is short-lived.)

I’ve tried two different recipes–the one I mentioned before, and I also tried another that I found at Happy Money Saver (click the link for the recipe used there). I did tweak it a bit myself, and I’m posting my changes below.

DSC_2027

The original recipe calls for three bars of Fels Naptha soap, grated. Personally, I prefer the more mild option of castile soap. Admittedly, it costs a teensy bit more, but I love using it in so many other ways that it made sense for us to consider using it for our laundry care, too. (A tip–grate the soap in a food processor, and the resulting “crumbs” are perfect for powdered detergent.) The actual recipe is quite simple–add a container of Borax, three bars of either castile, Ivory, or Fels Naptha soap (grated), 3 pounds of Oxy Clean, 3 pounds of baking soda, and a 4 pound box of washing soda to a large storage container (we recycled cleaned kitty litter buckets). Mix all of the ingredients together (mix well to ensure the scent crystals are thoroughly combined). Use 1 to 2 tablespoons per load.

The finished product.

The finished product.

The results? Our laundry is just as clean as it was when we were using commercial detergents. I haven’t noticed any substantial difference, and you use far less detergent per load, as well. Most recipes make a large batch which lasts most families for months. And while others have claimed that they have had trouble with the homemade detergent properly dissolving unless the water is hot, I haven’t had that issue at all. I am wondering if part of it is related to the fact that we used a food processor to grate the soap, when using a hand grater results in larger bits of soap that might not dissolve as easily. Combined with our homemade fabric softener, our DIY laundry care products are working quite well for our family (and our clothes smell wonderful). (NOTE–we have NOT used either product on cloth diapers, and we are not planning on doing so. Fabric softeners should not be used on cloth diapers, and we simply opt not to try the homemade detergent on them when the mainsteam options are working very well for us.)

However, we can have all of the laundry products in the world, store-bought or homemade, and none will work their magic for you like they should if you don’t find a suitable laundry routine that fits your family. And it’s safe to say that this is something that we struggle with. Honestly, we do just fine with doing the actual washing and drying. (And I totally stay on top of the cloth diapers, out of necessity.) But folding? Sometimes, the mountain of laundry will grow to ten loads or more before I finally sit down to fold it.

So, I sat down with some determination, and a copy of The Busy Mom’s Guide: Taming the Laundry Monster, by Angi Schneider, ready to overhaul our laundry routine (or lack thereof).


In Taming the Laundry Monster, Ms. Schneider shares with her readers several different laundry routines, as well as the pros and cons for each of them (i.e. weekly, daily, and “whenever something is needed”). She also shares how her own family’s laundry routine developed, and changed, over the years, as her family has grown.

One of the things that stood out to me is that she emphasizes that there is not one single system that will work for everyone, and that each family will more than likely need to change their own routine multiple times as needs and personal schedules change over time. This is different from so many other books that assert that there is one magical way to do everything, and that set up a reader for failure right from the start. This book isn’t like that at all, which I find refreshing. She also shares tips and experiences that are helpful when, as she calls them, “bumps in the road” occur, like sickness or a change in schedule. I found one particular section helpful where she poses questions for the reader to answer as you work to determine the right laundry method for you–cleaning personality type, what days the family has the most out-of-the-house commitments, what “particulars” need relaxed (i.e. am I too particular about how the clothes are put away), etc.

There’s even a section with tricks that she shares for removing specific stains, drying and ironing clothing, and even mending your items (I can’t sew on a button, but her book tells me how). Plus, there is a recipe for homemade laundry soap, ideas for odor removal and fabric softeners, and general tips for doing the wash (like buying socks of one type for the children…seems so simple, yet I never considered how difficult it is matching a million different styles of white socks that look the same, but aren’t really).

Through the help in this book, I have finally found a laundry routine that I am comfortable with and that seems to be working for my family. I asked myself the necessary questions, made the realization that what works for someone else won’t work for me, and with her help, I sat down and took the time to really think about my options and what would be the easiest system on both me and my family when it comes to our own “laundry monster.”

Interested in reading this e-book yourself? You can purchase it in PDF format on the author’s website, and until March 29th at 11:59pm, you can receive 25% off by using the promo code SPRING at checkout (on the Schneiderpeeps website only; not applicable on Amazon or for the Kindle version).

Want to win a free copy? The author is sponsoring a giveaway! One winner will receive a free PDF copy of The Busy Mom’s Guide: Taming the Laundry Monster. The giveaway is posted on the TPLT Facebook page–check it out for more details! (Giveaway ends at 11:59pm on Wednesday, March 26th, 2014.)  Thanks to Angi Schneider for offering this generous giveaway!)

GIVEAWAY NOW CLOSED! MOLLIE A. IS THE WINNER!

(NOTE: I received a PDF copy of the book I reviewed as compensation for my review. My opinion is, as always, my own, and is 100% honest. The giveaway prize is provided by the author.)

Make Your Own Fabric Softener!

There are seemingly hundreds of posts with this recipe on the internet, so maybe I’m just the last one on the block to try this, but…..

Today, I made my own fabric softener, and it is ridiculously easy. We’re talking “totally made in five minutes or less” kind of easy.

The ingredients:

6 cups of water

2 cups of hair conditioner (you can find this for a dollar at many big box stores if you choose a generic brand–and there are so many scent options available)

3 cups of white vinegar

DSC_1503

Pour the ingredients in a large storage container of your choosing….

DSC_1509


Then mix, and you’re done!

DSC_1510

Now you have nearly a full gallon of fabric softener ready to use! We have Toasted Coconut and Vanilla scented softener for roughly $1.50. Can’t beat that! 😉

Experimenting With Homemade Laundry Soap, Part One

I have a ridiculous addiction to buying laundry products.

It’s really pathetic, really. I have, just going off of memory, three types of stain removers, two oxi-type cleaners, two types of bleach, two types of lanolin-based wool wash, a huge box of powdered detergent, two containers of fragrance crystals, several “booster” products, and seven bottles of liquid detergent.

And that’s just from memory–there might be more down there. (I’m too lazy to go downstairs for an accurate count. Sue me.)

I know that I need to stop buying so many products because it really costs me a lot of money, and when you’re trying to get out of debt and to live a more provident, self-reliant lifestyle, having a full arsenal of laundry care products seems a bit…contradictory?

I’ve been interested in trying homemade laundry detergent for a while now, but I have been hesitant. We do use cloth diapers, and the ONLY detergent that gets them truly clean (for us, anyway) is mainstream powdered detergents like you would find in the grocery store. And I’ve thought to myself, if I have to keep that on hand for the diapers anyway, is there really much point in MAKING detergent, too?

Probably as much point as there is in having seven types of liquid detergent “just because.”

So, tonight, I went to my fellow bloggers at the Homestead Bloggers Network and asked them for recipes, as I knew they would be reliable, tried and true. I received a few, which I will share with you at the bottom of this post, but, due to the ease of production, and the fact that the one I chose included a pricing breakdown for a 5 gallon bucket’s worth (you had me at the words “many batches”), I went with the recipe provided by the lovely Linda Loosli with Food Storage Moms, and you can find the original recipe by clicking this link.

Their recipe consists of:

  • 1 cup Borax
  • 1 (grated) bar of Fels Naptha soap
  • 1 cup of washing soda (Arm and Hammer Super WASHING Soda…please note that baking soda is NOT THE SAME THING AT ALL!)
  • I added a decent sized scoop of scent crystals to add some fragrance to the detergent (you can find these at the grocery store). Other similar recipes allowed for this, OR, for the addition of essential or fragrance oils. This is optional, of course.

Add all of the items into a blender or a food processor, then pulse to turn them into a powder which will resemble the consistency of the brand-name detergent you would buy in a store. Store in an airtight container.

The materials used….

Gather all the ingredients....

Gather all the ingredients….

Not gonna lie…grating the soap isn’t the most fun job in the world…it’s not awful, but it’s a bit annoying.

Perfect curls of soap....

Perfect curls of soap….

Add the Borax, the washing soda, the grated soap, and any scent additives (if you choose), into a blender or processor, and pulse away.

DSC_1935

DSC_1936

The finished product, stored in a Tupperware container specifically reserved for cleaning products.

DSC_1938

Now, I have yet to try this on clothes yet (hence why this entry is a “part one”), but I was itching to document a Sunday evening’s kitchen experimentation. You’ll have to wait a bit for “part two.” It will be worth it. 😉 Thanks again to Linda at Food Storage Moms for the recipe!!

More recipes from trusted bloggers:

DIY Laundry Soap from 104 Homestead

Homestead Lady’s Homemade Laundry Soap and Dryer Sheets

Grain Mills and Flour Milling

Today, it is my goal to hopefully answer all of your questions regarding grain mills and flour milling–why to mill your own flour, what type of mill to choose, what grain mills are easily available (and all about each one’s specifications and capabilities), common grains that you can mill and how to use what you produce, with recipes galore!

Let’s begin, shall we?

DSC_1486

First up, why to mill your own flour

As you more than likely know, there is a large difference between refined, commercial flour and that which you mill yourself. Commercial flour (that you buy in the store) has all of the “good bits” of the wheat/grain taken out of it, like the nutrient-rich germ, and the remaining endosperm is then ground into flour. Why would a company choose to remove the best, and most nutritious part of the wheat and grain? Much like other processed foods, companies want their products to have a lengthy shelf life, and when whole grains are ground into flour as-is, they have a very short shelf life before going rancid. If you make a product that lasts longer, it will cost less to produce, and you won’t have to produce as much. So, nutrition is sacrificed for shelf life, economics, and consumer demand. And most consumers have budgets to watch, so they eagerly choose the cheaper option that lasts the longest, over the more expensive product that doesn’t last as long–even if that product is better for them than the more inexpensive one. Commercial flour is turned into basically little more than a starch, which acts like sugar in your body, and can lead to health problems and dietary illness if consumption is not moderated. I know you’re probably wondering, But the package says that the flour contains multiple vitamins? It has to. Because they take all of the good things out of the flour, the federal government requires that something “good” is put back in to make it resemble the original product. But, consider this analogy–say your favorite, valuable, antique vase is broken and shattered into several piece. Sure, you can glue it back together into something that resembles a vase, but it will never, ever be what it was before. It’s now just a broken, glued jumble of pieces that no longer fit together as they are meant to do. If you mill your own grains and produce your own flour, that priceless creation is still left intact, and all of the original value, in this case nutritional value, is still there.

So, you want to mill your own nutrient dense, high quality, whole grain flour, and you want to own a grain mill. What types are available for you, and what should you choose?

Let’s start with the two most obvious differences between mill types before we get into the finer differences. If you’re looking at it from a purely basic standpoint, there are two types of mills–electric and manual. Let’s look at the pros and cons of each of these before we break down the different types within each category.

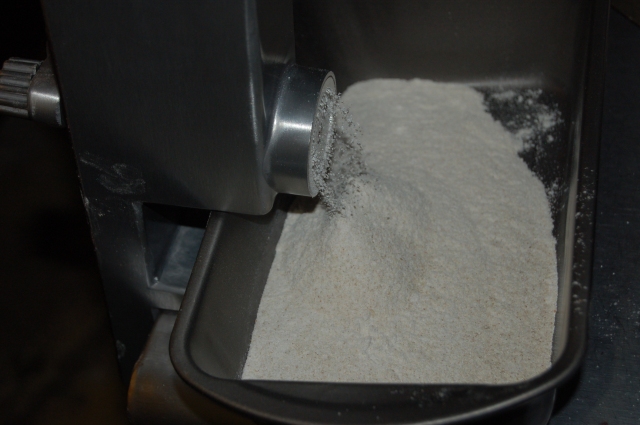
Electric mills, without question, have the largest capacity for grains, and the highest yield of flour in the shortest amount of time. Although there are more technical steps involved, there is significantly less physical effort needed to use them, as opposed to a manual grain mill. If you are looking to produce a large amount of flour in a short amount of time, and want to do this on a fairly regular basis, then you might want to consider purchasing an electric mill. The biggest downside, however, to an electric mill is that it obviously needs to use electricity. If you are considering a mill for survival or preparedness purposes, you might, at the very least, consider a small, inexpensive manual mill to have on hand in the event of a lengthy power outage. Another slight downside to electric mills is that you cannot really find an “inexpensive” electric mill on the market. On average, the cheapest electric powered mill runs roughly $179.00, which we will discuss later. (You can buy items such as grain mill attachments for stand mixers, but be wary of these as they are prone to damaging the motor/gear box of the stand mixer.)

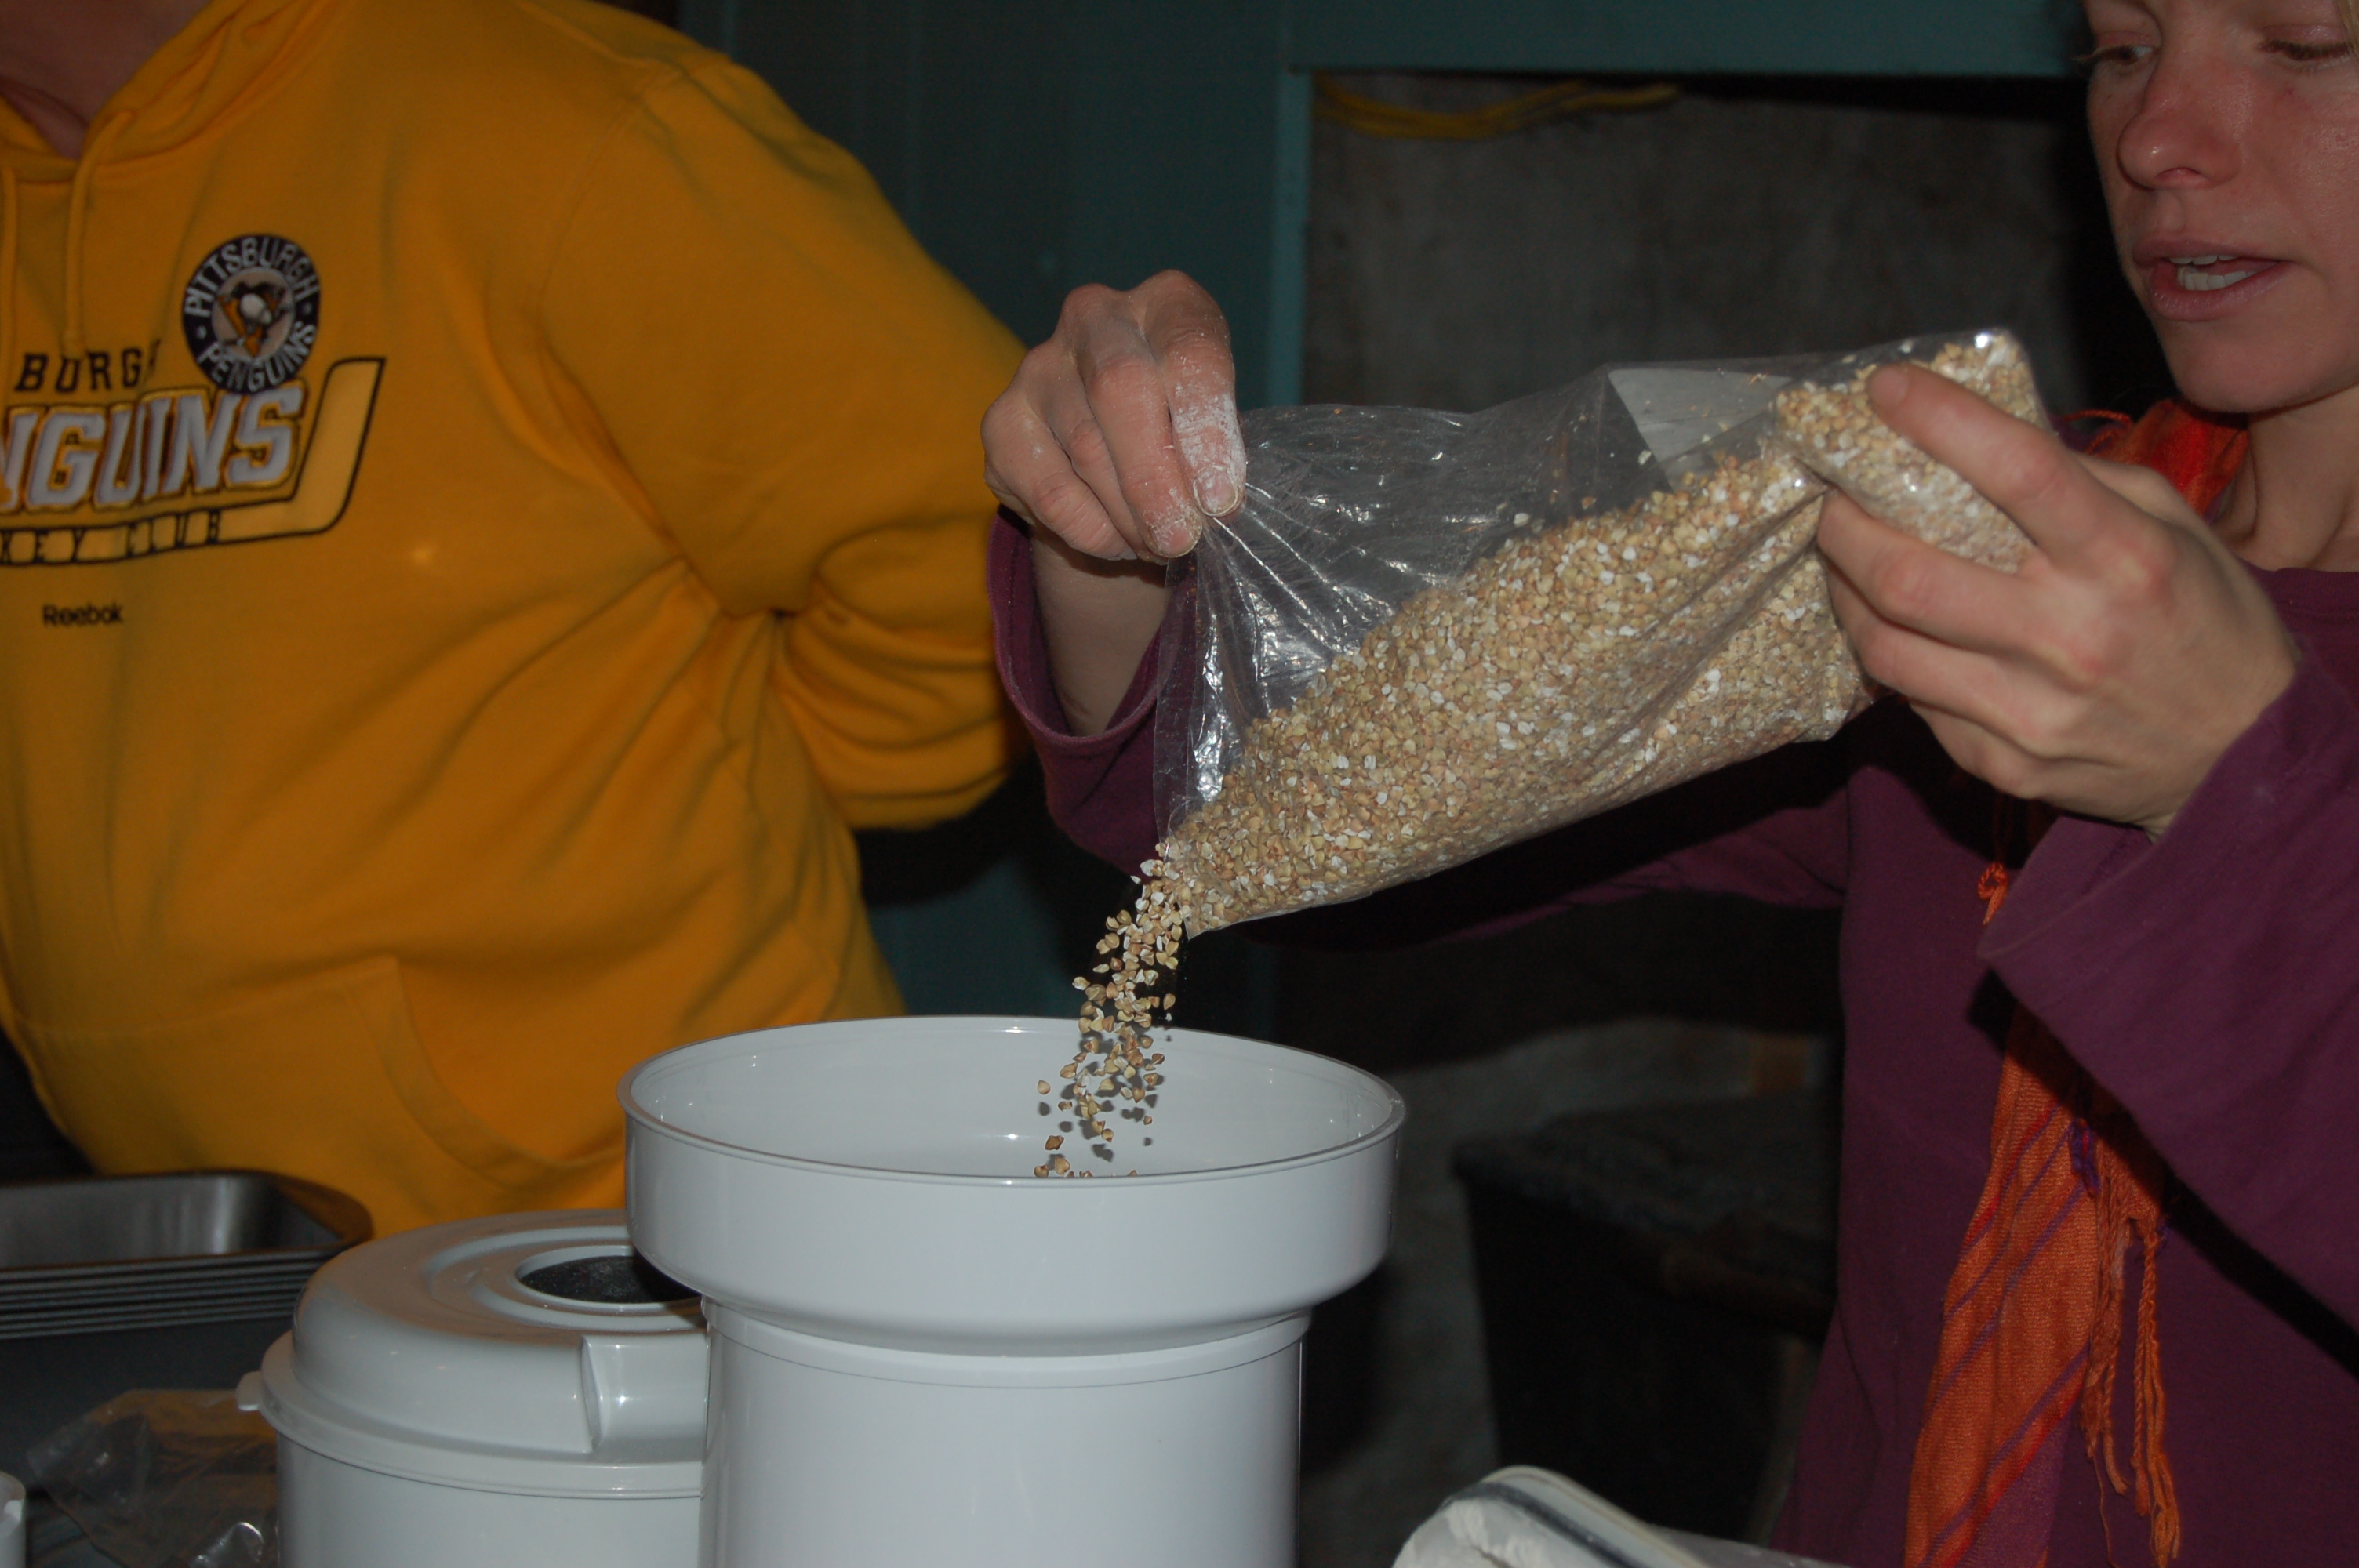
Manual mills run on human power and effort. There is a crank that you rotate to grind the flour inside of the mill (more on what is inside of these mills later). This can be a very strenuous and time-consuming job, as the grinding takes a significantly longer amount of time to complete. Grain capacity is also generally smaller. However, manual mills are not dependent on electricity to function, making them perfect for those who are searching for a mill for emergency preparedness purposes or who are wanting to be off grid. You can also buy them rather inexpensively if you only want to make a small amount of flour once in a while, and mills for this purpose can be found for as low as $50. Higher end manual mills, made with much stronger materials (and that often have lifelong warranties and heirloom quality), can be very expensive, ranging between $240-$1100, on average. Manual mills have simpler operation and fewer steps, and it is easier to adjust coarseness/fineness mid-use than it is with an electric mill. That being said, that makes it MUCH easier to make non-flour items, like homemade cereals that electric mills usually cannot produce.

All about electric mills–brands, components and styles, pricing, etc.

DSC_1484

DSC_1481

On average, electric mills cost between $179-$289. There are a few brands that cost significantly more. What I want to do is share with you three common (and easy to find) electric mills, and along the way, as we discuss each one, we will learn more about their components, parts, warranties, capacity, settings, etc. The information I will share with you will come directly from the company websites, which I will list with each description, as well as some places where you can purchase them (for price comparison).

  • Wondermill–This mill possess an LG Electronics motor (1250 watt). Grinds wheat, beans, legumes, corn, and other common grains, and you can purchase a small grains adapter for the mill that will allow you to process amaranth, millet, quinoa, etc. There is a website where you can see what it can and cannot grind at www.willitgrind.com. The hopper has an 8 cup capacity, and the canister has a 12 cup capacity and comes with a lid. The mill works through a motor that powers stainless steel teeth which crush the grains by impact until they turn into flour. This process is referred to as “micronization.” You can choose from Pastry, Bread, and Coarse flour settings when processing your grain. These mills are very highly reviewed, and they are known for being one of the top electric mills on the market. On the main website, the mill’s MSRP is $259.95 (http://www.thewondermill.com), though they are known to offer sales of $20 off at various times. (As of this writing, the mill is $239.95 from the manufacturer.) Limited lifetime warranty. Make sure to buy this mill from an authorized dealer (you can find them on the company website) in order to use the warranty.
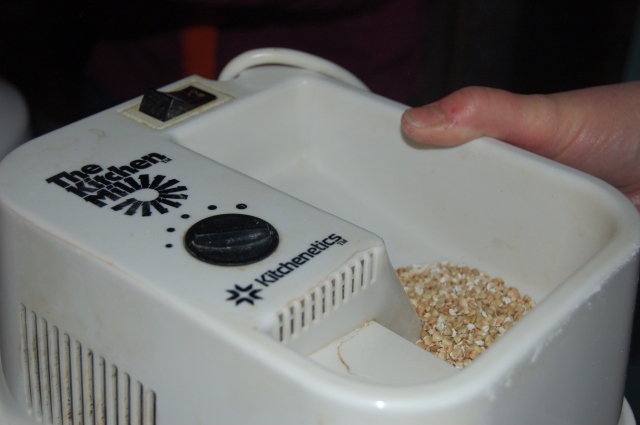
  • Blendtec Kitchen Mill–This mill  has a 1.8 peak horsepower motor. These mills have been on the market for many years, and at $180, on the manufacturer’s website, they are on the lower end of the price spectrum for electric mills. Comes with a six-year limited warranty. Hopper can hold 3 cups of grains. The 24 cup collection bin doubles as a lid. The motor comes permanently lubricated, so there should be few problems in that area. Mills all dry grains, beans, legumes, and corn, but, like with most electric mills, it cannot grind seeds and nuts. Manufactured within the United States.
  • Nutrimill–Manufactured by L’Equip/Bosch, these mills are made in Korea. They are capable of milling all dry grains, beans, legumes, etc, but like the other mills mentioned, they will not grind seeds or nuts. This mill is known for being one of the quieter mills on the market. Has a 20 cup bowl capacity, and they claim on their website that the mill can grind 20 cups of flour in five minutes.  Mill uses stainless steel milling heads. The motor is high powered at 1200 watts, similar to the Wondermill. There is a limited lifetime warranty provided. MSRP on the official website is $289.99. However, the mill can be found for $229 at the time of this writing at Amazon (all Amazon links are affiliate links): L’EQUIP Nutrimill Grain Mill

Interested in manual grain mills instead? Let’s take a look at three market favorites:

DSC_1471

Before you read more about manual grain mills, please be aware that there is a large market for manual grain mills, and I am only covering the three most commonly purchased. Also, strangely enough, there is a very wide price gap, with some mills priced as low as $60, and there are some on the market that cost well over $1000 (I am not featuring anything that high end here). I recommend you also do research yourself–you might find a brand that you prefer that is not listed, as there are many more manual mills available than electric ones.

    • Victorio Hand Operated Grain Mill–you will struggle to find a more inexpensive, yet effective, manual mill. Compact, yet versatile, this little mill outperformed a mill 9 times its price during our grain milling course (I was blown away). Stainless steel milling chamber and a 2 year warranty come with this tiny machine. This mill cannot grind oily seeds and nuts, like its electric counterparts. For those who have emergency kits for their families, this would easily fit into a bug out bag, etc. MSRP is $89.94, but Amazon currently has this for the best price at $61: Victorio VKP1012 Hand Operated Grain Mill
    • Wondermill Junior Grain Mill–These mills are manufactured in India, and are produced by the same company as the Wondermill Electric Mills. They are one of the highest reviewed manual grain mills on the market. One of the standout claims with this mill is that the manufacturer states that it will grind oily seeds and nuts, so for those who are interested in making nut butters or pastes, this mill would be an excellent option for you. This mill uses stainless steel augers to grind grains as well. List price is $300, but you can often find it cheaper elsewhere. Limited lifetime warranty. Hopper holds 1 quart of grains. Can be found on Amazon for $220:Wonder Junior Deluxe Hand Grain / Flour Mill by Wondermill
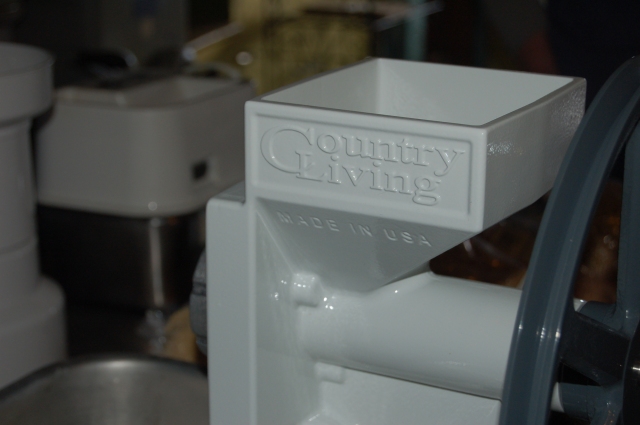
    • Country Living Grain Mills–I personally own this mill, and I have a lot of experience with it. Made in the USA, this mill is made of heirloom quality, using industrial grade ball bearings, solid I beam construction from cast aircraft aluminum, and stainless steel shaft. There are lots of accessories available for this mill, including a system to motorize it (costs several hundred dollars), or to convert it to be powered by bicycle. However, there are some inherent cons–MSRP on the manufacturer’s website is $429.00, before any added accessories. Also, the flour output seems very slow compared to other mills, though it creates a higher quality flour with a better texture. Limited lifetime warranty. From personal experience, customer service is excellent. Mills with slight cosmetic damage are sometimes available for a discounted price.

What grains should I mill, and what can these grains do? 

DSC_1479

I am a limited human being, and, like you, I am on this journey right along with you (hence, the title of my blog). If I tried to wax endlessly just about wheat, I could write pages and pages, and I am already overdue in providing this “class” to my readers. So, I will share with you some EXCELLENT online resources regarding different types of grains, sites with great recipes, and what these grains can provide for you:

King Arthur Flour discusses whole wheat flour, the Nutrimill, and provides a tutorial for Whole Wheat Sandwich Bread.

Do you know anything about spelt? Try this species of wheat, per The Kitchn’s suggestion.

Black Fox Homestead provides a recipe for Spelt Flour Coconut Bars, for those of you interested in trying spelt flour.

Dr. Weil teaches us about barley, the world’s oldest domesticated grain, and Bob’s Red Mill introduces us to the concept of Barley Brownies.

Have you ever heard of einkorn grain berries? The Homesteading Hippy tells us more about this “ancient wheat variety.”

The Homesteading Hippy also shares recipes for Pumpkin Scones AND Blueberry Scones.

Bob’s Red Mill has a yummy recipe for Rye Pancakes that uses both rye AND buckwheat flour–both being grains you can mill yourself!

Kristi Stone from The Mind to Homestead has so many scrumptious recipes to choose from, like Buttery Shortbread, White Wheat Dinner Rolls, and Pumpkin Bread.

And……..because they cohosted our live class, I would be remiss if I didn’t include this AMAZING recipe for Whole Wheat Oatmeal Berry Crumb Bars from the fabulous farm, Goodness Grows!

This is only a small list of grains and recipes–there are countless other varieties to try. That is the beauty of milling your own grains–you get to explore a whole new culinary world outside of Big Box Store Flour. Now, go play! 🙂

NOTE********* I personally own a Wondermill, a Victorio Hand Crank Mill, and a Country Living Mill. Country Living provided me with a free mill to use for my blogging endeavors, and also for a future review. However, the others were personal purchases. If you are interested in my take on either model, please feel free to email me at laurashelton115@gmail.com.

Pumpkin Spice Syrup

I saw this recipe on Facebook, and I simply had to try it.  It’s even the “weekly goal” of the self-reliance themed Facebook group I started: https://www.facebook.com/groups/1378076122414917/

Feel free to join us there. Just mention you found us via this blog. The group is “closed,” but I will add members if anyone is interested. The group is a “safe,” non political, non “agenda” place to share ideas for a more self reliant and sustainable lifestyle.

Anyway, back to the recipe…I found it on Facebook, and the original post can be found on a page there called “Foodgasms.”

pumpkin

(Recipe taken from an outside source.)

1 1/2 cups water
1 1/2 cups white sugar
1 tbsp ground cinnamon
1/2 tsp ground cloves
1/2 tsp ground ginger
1 tsp ground nutmeg
2 HEAPING tbsp pumpkin puree (canned stuff is perfect!)
Directions:In a small pot, dissolve the sugar in the water over medium heat.
Add remaining ingredients and cook for about 7 minutes on medium-high heat. You don’t want to boil the mixture, just simmer it so all the flavors come together, stirring frequently.
Strain mixture using cheesecloth or a tea towel. (I didn’t have a cheesecloth or tea towel, so I just strained mine in a wire/mesh strainer. If you want a finer syrup, make sure to use a cheesecloth or tea towel)
Pour into small bottles and store in the refrigerator.

Product Review and GIVEAWAY: Molten Deep Dish Cookie Mix From Krusteaz

I’m SO very excited to offer our first sponsored giveaway. Thanks to Krusteaz, I’ll be reviewing their new Molten Deep Dish Cookie Mix line, perfect for back to school snacking, OR, as we’re doing, a lazy Sunday morning activity. AND, one of YOU dear readers will WIN the ENTIRE LINE of Krusteaz Molten Deep Dish Cookie Mixes! (Now, you’re excited, I bet!)

Have you heard of Krusteaz baking mixes? We absolutely love their products. I exclusively use their pancake and Honey Cornbread mixes for my personal baking, and I’ve made many of their bar and muffin mixes for special treats and get togethers. I can honestly say that their mixes have never failed me when I’ve needed a quick, yet satisfying treat.

When I was offered the chance to review their new Molten Deep Dish Cookie line, I was ecstatic. I love any baked good that promises a warm, gooey, chocolate-y (or caramel) filling. I love getting “molten lava” desserts when I am at restaurants, but have you ever seen recipes to try to make them at home? They are SO labor intensive, and with two little ones, who has the time?

I love the fact that this new mix offers the chewiness of a traditional cookie with the added bonus of a creamy center. They are available at most major grocery stores, for around $2.79 a box. They come in three flavors: Classic Cookie With a Chocolate Center, Sugar Cookie With a Chocolate Center, and Chocolate Cookie With a Caramel Center.

For this review, I will be focusing on the Classic Cookie With Chocolate Center, as I’m a bit traditional in my cookie taste.

Doesn’t this look divine?

910917D3A_FOB

I have to give a shout out to my awesome husband. I had a bit of a mishap with my ring finger and the edge of a butcher knife while washing dishes this morning, so he very graciously handled the baking for me. Thank you so much! I’m lucky to have a hubby who loves to cook and bake great treats!

Let’s get started, shall we?

DSC_0004


(Ignore the tape on the drawer. We’re replacing cabinet hardware right now.)

Now, you only need two ingredients in addition to the mix–1/3 cup softened butter and one egg.  That’s it. Very budget and pantry friendly.

Preheat your oven to 350 degrees. Spray/grease a muffin pan, and soften the butter, if necessary.

Now, mix the butter, egg, and provided cookie mix (inside the box).

DSC_0010

One thing we noticed: It was hard to get the dough mixed together by hand. So, we put it into our Kitchenaid stand mixer, which worked well. If you have one, I recommend using it for this step.

DSC_0012

DSC_0014

Once the ingredients form a good dough, then roll the dough into 24 equal sized balls. One trick–separate the dough into two balls, then four, then eight, and then each of those eight balls can be rolled into three. This helps to keep the dough balls even.

DSC_0016

DSC_0017

DSC_0023

Place one ball into each of the twelve muffin cups in your pan, and flatten it into the bottom. Reserve the remaining twelve dough balls for later.

DSC_0025

DSC_0027

Now, cut the corner off of the filling packet, and squeeze an equal amount onto the center of each flattened dough ball.

DSC_0031

DSC_0034

Now, flatten each remaining dough ball, and place on top of the prepared cookies to seal in the centers.

DSC_0044

Press down the edges to seal the cookies, if necessary. Then bake for 18-20 minutes! When they are ready, a knife around the edges helps to extract them from the pan.

DSC_0002 DSC_0006

Don’t they look yummy?!

They tasted just like a homemade cookie on the outside, a bit crunchy on the edges, but wonderfully and satisfyingly chewy at the same time. The chocolate filling was very creamy and warm, yet it didn’t overpower the cookie at all. I would recommend this product, for sure. It makes for an easy after school snack or a great dessert for a small get-together. The only complaint we have is the struggle we had mixing the dough, but an electric mixer solved that in a flash!

Now, for the part I know you are waiting for! One lucky reader will WIN the ENTIRE Molten Deep Dish Cookie Line from Krusteaz. The contest will end on September 22nd, 2013, at 11:59pm. How do you enter? Leave a comment on THIS blog post with your name and letting me know you liked my Facebook page

Additional entries can be earned if you add an additional comment here telling me what you will do with the prize if you win, comment that you shared this post on Facebook, and also a comment letting me know you follow my blog by email! I will verify the winning entry’s validity.

Winner will be chosen at random via http://www.random.org. Contest ends 9/22/2013 at 11:59pm. I will announce the winner here and on my Facebook page. If you win, you will have 48 hours to provide your information before I have to pick another winner!

DISCLAIMER: I was given the Molten Deep Dish Line to review, and that was my “compensation.” The review is 100% honest, and the giveaway, including shipping and handling of the prize, will be handled by Krusteaz!

Tricks of the Trade–A Few Tips For Making Meatballs

I’m a meatball newbie. Sure, I’ve made them before, but I always encountered problems. The mixture wasn’t evenly combined, the meatballs wouldn’t cook evenly, and I’d leave feeling frustrated.

However, thanks to the glories of Facebook and the interwebs, as well as trial and error, I’ve learned a couple tricks for making the job easier.

The recipe I’m using is from Betty Crocker, and it is ridiculously simple and scrumptious. The “tips” will follow the post.

1
lb lean (at least 80%) ground beef
1/2
cup Italian-style bread crumbs
1/4
cup milk
1/2
teaspoon salt
1/2
teaspoon Worcestershire sauce
1/4
teaspoon pepper
1
small onion, finely chopped (1/4 cup)
1
egg
Heat oven to 400°F. Line 13×9-inch pan with foil; spray with cooking spray. 
In large bowl, mix all ingredients. Shape mixture into 20 to 24 (1 1/2-inch) meatballs. Place 1 inch apart in pan.
Bake uncovered 18 to 22 minutes or until no longer pink in center.
Now, whether it is meatballs or meat loaf, there is one foolproof way of making sure your meat mixture is thoroughly combined…and that is my dear friend, my Kitchenaid.
DSC_0682
If you have one, make sure you use it for more than just baking. It does an excellent job mixing an evenly combined meatball mixture (or meatloaf, etc.)
To make uniform (or closely uniform, anyway) meatballs, pat your meat mixture onto a solid surface, like a cutting board, in a roughly 6″ x 4″ square.
DSC_0684
(Notice, I said “roughly.” Of course, since I am blogging this, I can’t get it close to save my life.)
With a butter knife, cut mixture into six rows and four columns (basically, into 24 balls).
DSC_0685
DSC_0687
Then roll into balls and place into pan! Bake as indicated!
DSC_0689
DSC_0690
Isn’t that easy?